Showing posts with label handmade. Show all posts

Thursday, April 21, 2011

I have been sewing...really!

You know, I think I've used that title before! ;-) I even have proof! This is one of the new patterns being released for spring by Colette Patterns:
It's the Violet Blouse. Here's the back, too:

I have to say, I really love this blouse. I was a little hesitant at first when Sarai sent over the line drawings. I was concerned about the collar looking too childish but it really doesn't. Honestly, it fits so well and goes with just about everything. I've worn it with jeans, skirts, and my white capris like I am here. It looks super under my jean jacket too. My husband even noticed it (he never notices my clothes, unless it's underwear) and said he really liked it and the vintage feel it has. Yes, MY husband said that! I used a cotton voile that I found at my local thrift store. I'm not sure if it's vintage but I love it just the same. For all my sewing sistas out there, I used the size 18 and made no alterations. I think I will just lower the bust dart a bit (yes, there's one in there...) to accommodate my ginormous rack...although it is getting smaller! I had to buy new bras even! Gasp! I just haven't had time fiddle with fitting a new pattern, let alone make any new ones.

Anyhoo, I also made the Ginger skirt but I used a horrible mustard brown fabric to test it and I can't bring myself to photograph myself in it. I have a cute stiped denim that I want to make it up in using Version 3 for the chevron effect.

I've also been busy testing for Pattern's by Figgy's. Below is the Jane Dress and Blouse that will be available soon! It's a lovely little dress with two sleeve variations and a blouse that has a hip sash as shown below. Both sleeves can be used for the blouse also.
The little dress is made from cotton voile that may look familiar...
The blouse is made from a lightweight cotton seersucker.
That's it for now. I've got more pattern testing going on here at the ol' sweatshop. More on those soon!

Have a very Happy Easter is you celebrate it! If not, have a nice weekend!

Thursday, March 3, 2011

Getting Clean ...and a Recipe!

A few weeks ago I came across the One Green Generation blog while they were going through a detox cleanse. I followed along until they finished and it seemed like such a great experience for them! I bought the book and have been working my way through it. It sounds like a cool deal to me so I told hubster about it and it's a go with him too. I want to finish the book and then we'll get started. The total cleanse is for 21 days + a week long elimination process that is done before the cleanse is actually started. I think I'll do the whole thing, but I told my husband he can at least try for the 7 day cleanse and if he feels up to it he can continue with me. I'm pretty excited about it and if anyone is interested I can do daily posts like they did on OGG. The book says keeping a journal is a good idea anyway.

Anyhoo, on to the recipe! This is another "bath and body" recipe in my quest to make myself and my environment cleaner and greener! This time it's for a powdered deodorant. I used to use just straight baking soda but found that it really made me itch so I went back to the stick deodorant/antiperspirant. I was reading recently that the soda by itself is too strong and that it should be cut with corn starch so I thought I'd give it another go. I tried this recipe and have been using it for over a week and really like it. I even got hubby on board! I'm pretty sure the recipe came from the OGG blog too, I just cut mine down so it would fit in my 4 oz. jars.


Powdered Deodorant

1/4 cup Baking Soda ( I use Bob's Red Mill "Aluminum Free" Baking Soda)
1/4 cup Cornstarch (I'm wondering if arrowroot would work too?)
2 drops Tea Tree essential oil (I use NOW brand)
1 Bay Leaf

Mix the soda and starch together. Add the 2 drops of tea tree oil and stir with a toothpick (or whatever you have on hand. I used a bobby pin since I was mixing this up in my bathroom!). Pour into a small jar or other container with a tight fitting lid. Stick one bay leaf in there and close up the jar. Shake to mix it all up. I let mine set overnight but I don't know if that's absolutely necessary. I'm sure you can just use it right away. To use, I take a cotton ball and use it like a powder puff to apply enough powder to cover my underarm area. It doesn't take much!

Now, this doesn't prevent wetness; although, the starch does absorb a little. I swear I have had no odor and my husband says he hasn't either! Cool! The real test will be this summer when even the store bought stuff doesn't help me out.

Next up is homemade laundry detergent! There are about a bazillion recipes on the web for laundry soaps. I'm trying a powdered one and I'll let you know how it works!

In sewing news, the time is coming when I'll finally be able to unveil what those crazy Pattens by Figgy's ladies have been up to with their book! I can't wait!

Friday, January 14, 2011

Somethings Gotta Give...

I'm back hitting the books again after a glorious, month long Winter break! I have three classes this semester and it looks like they're going to be a little tougher. Especially Human Anatomy. I'm already seeing that I'm going to have to let a few things go, or at least "lessen my presence". Unfortunately this blog is probably going to be one of them. If you haven't noticed, I have a little poll in the right hand column to see what kind of tutorials and posts about lingerie sewing you'd like to see. I still plan to honor that, but the posts may come far and few between. Not that I've had any rhyme or reason to my posting to date, but you get my meaning. I figure I'll know more as I get into the semester to see really how difficult my classes will be.

As for the poll, I see most of the votes are going towards bras. My fave! So, what do you want to know? Fitting techniques? How to construct a bra from beginning to end? Fabrics, patterns, and other components? Anything?! I'm excited about putting together posts and tutorials and really want to know what exactly you'd like to see! Let me know what you want to see for the other stuff, too. Kelly asked about a bias-cut slip for the curvier set. CarlaF wants to know about fitting bras. I can do a post on sewing panties. What do YOU want to know?! Post in the comments or email me privately if you'd like. I'm all ears!

Monday, December 13, 2010

Handmade Christmas part 1

My daughter, believe it or not, has been begging me desperately for a Christmas outfit to wear to Grandma's. She even wants a dress! The ultimate Jean Girl wants a dress! I think I will faint now... She showed me a picture from a magazine that has a girl in a long sleeved striped top with a little sundress over it. I said I would get to it if I had time... LOL! I'm sneaky that way.

Anyhoo, I've been pouring over all my patterns and Ottobre magazines to find something suitable and hopefully that she'll like. It's probably going to come back and bite me in the butt for not working with her on it, but what can I say, I'm a glutton for punishment! I've already finished the striped top and I wrapped it before I took a picture. Doh! It's Ottobre 2/2007 design #3(I think). I used some Chez Ami black and white striped cotton/Lycra. I actually made myself a shirt with the same fabric and the same pattern. I made mine with an aqua neckband but chose white for hers. I love that shirt and I hope she will like hers. For the dress, I'm using Lana from Ottobre 5/2010. I think the woman in the magazine looks so cute with the long sleeved dress underneath. I figured it'd be a lot more modest and warm than a tiny sundress. The most trouble I've had was finding fabric to use. Most of the knits I have are boyish or way to thin. I ended up going to the thrift shop in search of fabric and came away with a $2 long sleeved knit dress in a pretty plum color. It came with a vest too but I was able to cut the entire pattern from the main dress. That pretty much reduced it to shreds!
This is all I have left!

Now I have the pattern all laid out and ready to sew.

I've read others' reviews and it seems like a quick sew. I'll probably get it done today while she's in school. I may wrap it, but I'm itching to just give it to her when she gets home!

Friday, November 12, 2010

Sewing for the Boy!

Well, I've been sick for going on 3 weeks now. It's my danged sinuses, and I'm too cheap to go to the doctor for meds. But, I tell ya, it hasn't slowed me down in the sewing room! Besides my test sewing for the book, I've really been on a kick of sewing for Conner lately. He's been going through this stage where he doesn't like his jeans with snaps. His little fingers aren't quite strong enough to snap those buggers. I think most of this stems from bathroom breaks at school and having to schlep back down the hall, pants undone, for his teacher to help him with them. I certainly can't blame him! That sucks. So anyhoo, I had made him up the Dapper Dillingers awhile ago in a twill and he has really been wearing those out. I love the styling with the flat front and all. I think they look more 'grown up' than an all-elastic waistband, too. Here they are:
I decided to make him a pair in denim since it's getting cold here in Kansas. I have some really nice stuff that I've had setting around for quite awhile. I made him some jeans a couple of years ago from it and they outlasted every pair I bought off the rack! They still look good even now, they're just too short. Conner is pretty thin, only a 20" waist, so I made him the size 4/5 Dappers. The length was spot-on, too. I might need to lengthen just a touch next time so they last even longer. I didn't want him walking on the cute cuffs, though. Although, if he did, and the fabric frayed, the cuff would be so easy to replace! For this pair, I drafted a faux fly so they would have the look of jeans. I love how it turned out!

Sorry about the wack-a-do coloration. I don't know what's wrong with my camera. It's almost 6 years old, that's what's wrong! You can find more detailed pictures on my flickr page!

I also made him another pair of jeans. This is from one of my favorite Ottobre patterns. It's from the 1/2009 issue and is design #21, among others (it's the base for several styles in the issue). They are an elastic waist pant and are somewhat slim fitting although it doesn't look it on him! They are so easy to throw together; I swear it takes me about 30 minutes. Plus, it's a blank canvas for all kinds if embellishment: pockets, patches, etc. Next go on these, I will add a faux fly too and maybe a separate waistband.
And last is a Tee for Two! I made this up using some of Patty Young's "clown stripe" knit that was gifted to me by Shelly. It's some pretty lush stuff. I've read about the extreme shrinkage so I washed and dried 2-3 times before I cut into it. He wore the shirt and then I washed it on cold. The second time it was still the same size so I think we're good.
It fits so good and I love the slimmer cut, too. These are a fast sew and they have raw edges so no hemming! Makes 'em go that much faster! I was going to cut out a few more but didn't get around to it. I think this weekend I'll buckle down. He really needs some long sleeve shirts!

It's kind of funny because I just told Millie how my kids were getting to the point where they don't want to wear "Momma Made" stuff. This week Conner has worn at least one handmade garment each day! We even had two days where everything down to his undies were handmade. Love those days, even for myself! So I guess I'm eating those words, Millie! Ha! And I'm tickled pink!

Hope you all have a wonderful weekend! We have a chance for snow! I think that's a perfect reason to snuggle up in my sewing room!

Monday, October 18, 2010

Those Sewing Whirlwind Pics!

Hi! Happy Monday!
First off, I want to sincerely thank each and everyone one of you for your kind comments about my Mother-in-Law on my last post. You all are just such a wonderful bunch of people! You truly warm my heart. That may sound cheesy and cliche, but it's true dammit and I make no apologies. She is doing much better now, thank you. She spent 5 days in the hospital and we found out this all stemmed from a really horrible sinus infection. She feels better than she has in months so we have been wondering how long she's been carrying around this infection.

Anyhoo, I finally had some time to snap pictures of my 'whirlwind sewing escapade'! This is a pretty long post, so go grab a cup of tea real quick! ;-)

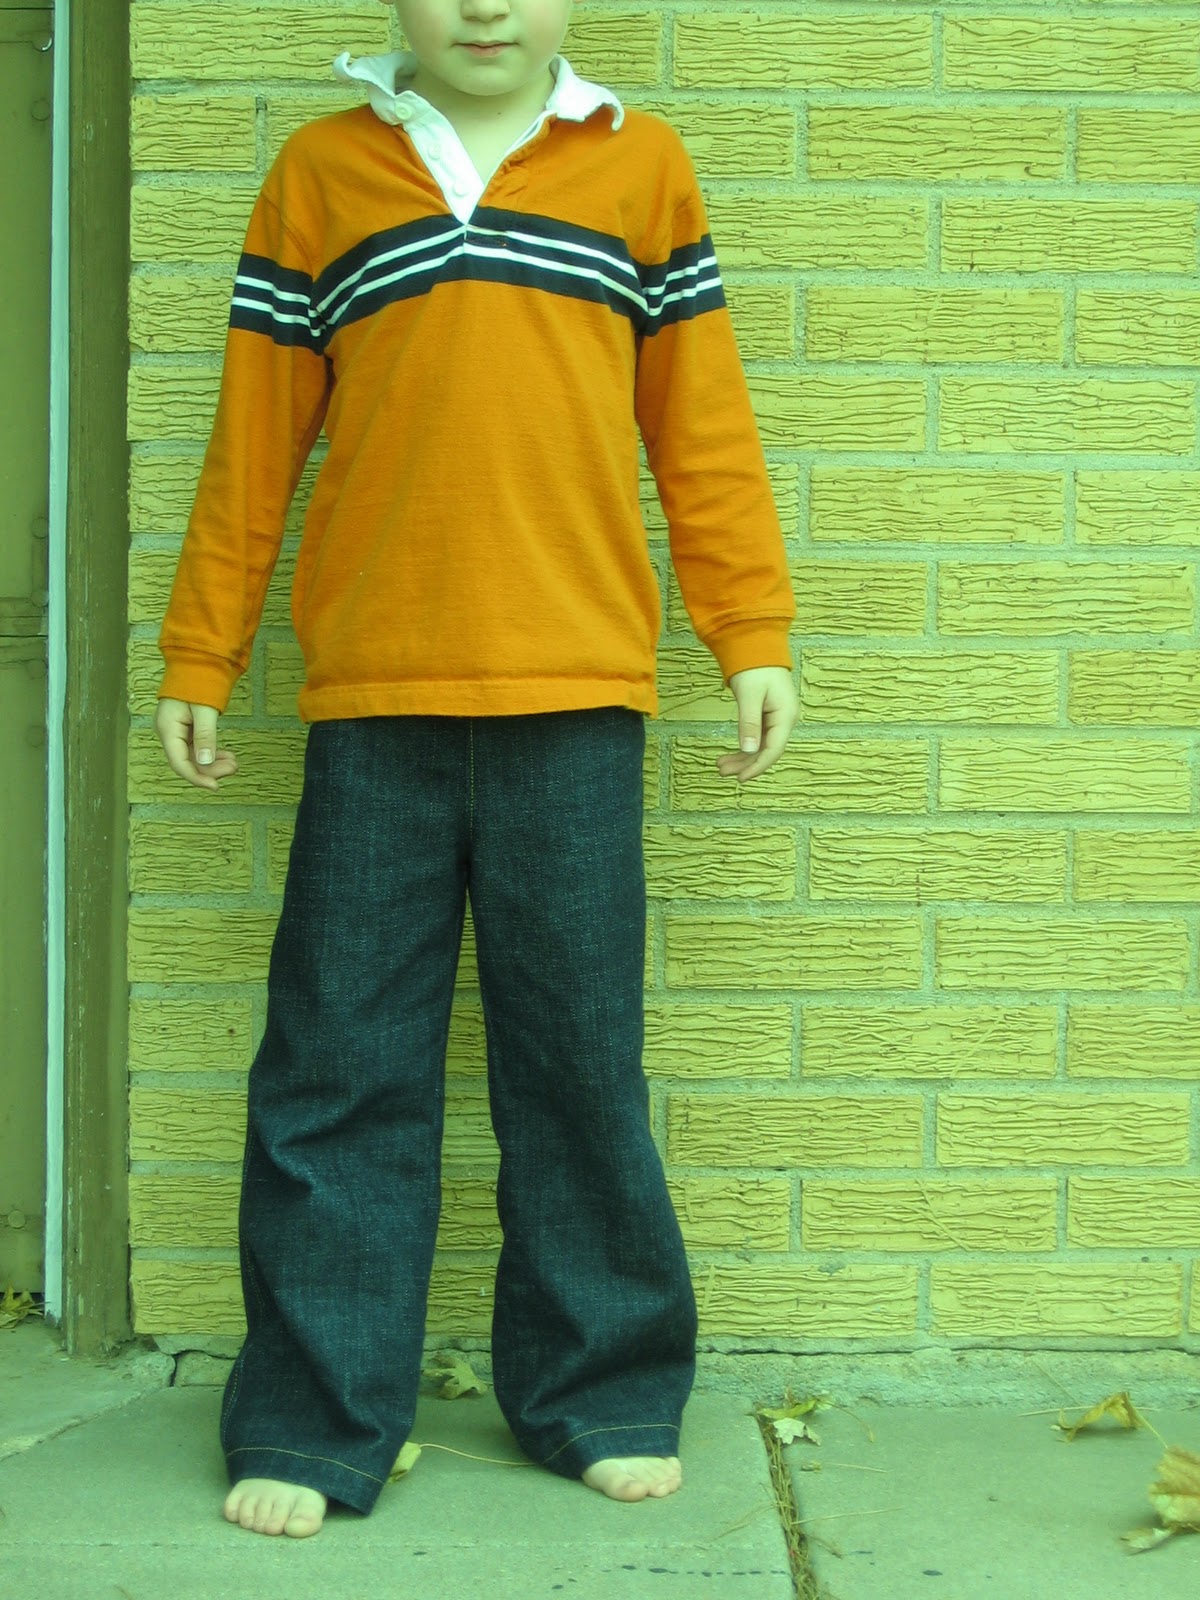
Okie dokie, Numero Uno is the easy peasy circle skirt. I think this took all of about 30 minutes to make, cutting time and all! I just plugged my measurements into the formula given in the tutorial. The only thing I changed was the waistband. Instead of using wide elastic I used a brown cotton/Lycra and made a band about 14" wide x my waist measurement. I then stitched up the side and folded it in half, wrong sides together. Aligned the raw edges of the waistband and skirt and stitched them together. This makes the very comfortable "yoga waistband" you may have heard of. I can leave it wide or fold it over. For the hem, I was able to use my handy dandy rolled hem foot on my regular machine and voila! A skirt!
The fabric is some I've had in my stash for probably 10+ years. It's kind of a weird color and I have nothing to wear with it at the moment. The fabric is most likely poly and has a touch of sheen. It's sort of a heathered brown/gray with peach... I dunno.

Next, is the bra. This is Merckweardigh BHL15. She now has an Etsy shop and the patterns are in English! Whoo hoo!

 I used some odds and ends to put it together but I like how it turned out. I've made this bra before but I used all stretch fabric and it wasn't supportive at all. That bra is too big now, but I thought I'd try this pattern in a non-stretch fabric. I bought this tricot last year to use for some custom order panties and was dissapointed to find that it was a bonded nylon tricot. Bonded = No stretch, what-so-ever. The shop said nothing of this in their discription, of course, so I ordered it. It worked out fine though because it happens to be the perfect fabric for bras! My favorite RTW Freya bra is made of some similar stuff! Well, anyway, after all that the bra didn't fit in the cups, which is really too bad since the band and underwires fit perfectly!! The lower cup is good but the top squishes my breast tissue in a very unflattering manner. I'm thinking, and if I can get up the guts, I can slice the top cup while wearing it down to the seam and measure how much I need to add then transfer those findings to the pattern. I still haven't gotten up the nerve yet but I may try it.

Lastly, This is my mock-up of Vogue 8546:

 
This first picture turned out all fuzzy for some reason. Sorry 'bout that!
The back shows the wacky fabric a bit better. I really should take a close-up. It's some funky stuff, I'm tellin' ya. I'm forever attracted to the funky fabrics, though. I have a slew of '70's polyester autrocities, but I love 'em just the same. This fabric has a little bit too much body for this jacket. I think it will be much better in something more fluid. That's something I don't have in the stash at the moment, though! This fabric adds too much bulk in front and that's something I really don't need! All-in-all, I really, really like the jacket! It's very comfortable and I'm keeping my eye out on a good deal for some wool jersey. The only thing I'm going to add is a big button, kind of where my hand is in the front view, to hold it closed. 

Now for a bit of exciting news! As you know, I have been a pattern tester for some time. Most recently working with Patterns by Figgy's. Well, the lovely ladies behind PBF, Shelly and Karen, so very graciously asked me to be one of their pattern testers for their NEW BOOK!!! It's coming out next year! Yes!!! Shelly and Karen are writing a book and I get to help test for it. I'm also now an official tester for Wiley Publications. My name will be in the book and on their website and everything! Needless to say, I'm so excited and feel so honored! The only thing that really sucks is I can't tell you what the book is about. YET! As soon as I get the go-ahead, I'll let you all know. I can tell you right now some of you are going to be most pleased...

Well, I guess that's it. I think I have about three posts in one here folks, but it's been building up!

Have a wonderful week!

Friday, October 1, 2010

School House Tunic #1

Happy Friday to ya! I finished up my toile or "wearable muslin", if you will, of the Schoolhouse Tunic from Sew Liberated this morning. I gotta say, I LUV it!


It may not look like I like it here, the sun was in my eyes...
Before I cut into my brown fabric, I wanted to test this baby out. This style of front, empire seam to be exact, is not always my friend since it's almost always to short to cover the girls. I think the style itself looks pretty good on me, when it fits.

I did a kinda-sorta tissue fit. I just held the front piece up to get an idea of where it would hit on me. It was fer sure too short. I guesstimated that I needed about a 1 1/2" FBA. I use the method from Fit For Real People for adding a dart to a dartless top. It should be noted that the fabric is not really the right kind of fabric for this tunic. It really needs something with more drape. This is a stretch poplin that I've had in my stash for awhile. It was a long enough piece so I just went for it. It just has too much body so it kinda sticks out from my body when I wear it, and boy does it wrinkle like a mofo!
Back. Wrinkles. Meh.

Belted. I really like this look. Helps cut down on the poof factor.

My little ham. He wanted to get in on the action. He made sure I said "cheese".

Here's one before I did my hair and makeup. It shows the lines a little better.

And another. This shot is to emphasize the poof factor with this fabric. I'm not pregnant. You can see the bust dart I added here better, too. On my next version, I need to raise the point up about an inch because this one doesn't point to my apex. I also don't really like the elastic in the sleeve. I think I'll just take that out.

All-in-all, I really like this top. I've worn it all day and I've been very comfortable. There are lots of styling options, which is a bonus. When I was working on this last night, I tried it on over my jeans and that looked pretty darn cute, too! I hope to get my brown version done this weekend since I ended up not having any homework. Woot!

Have a Happy Weekend!


Friday, July 23, 2010

Some Bra Sewing At Last!

Surely you all must be amazed! It has been entirely too long since I've SEWN a bra, let alone posted about sewing them. So, what the heck happened?! Well, I got kinda burnt out and also miffed at the above bra. Um, remember this bra that I was making for a Pattern Review contest? Yeah, that was back in freakin' February! I just finished***read: slapped together*** it yesterday and when I put the damn thing on it was too BIG!!! Damn! Well, no worries. It has been stripped of every part that I was able salvage. The outer fabric (the sparkly stuff) is soooo stretchy that it just looked like crap anyway and that's what got me pissed in the first place. There were poofy bits every where and wrinkles. Oh, and it gave me NO support so "OFF WITH HER HEAD!!" or in this case straps, elastic and hooks and eyes....
This little cutie is a bra I started for my daughter several days ago. I finished it up yesterday, too. Miz M has been asking for a nude bra to wear under a white tank top. The pattern I used is Kwik Sew 3300 and as with most KS patterns, it was a breeze to sew up. I used plain ol' nylon tricot for the cups and powernet for the back. We had some fitting issues that had to be worked out but all-in-all I think it turned out really cute. Well, really the only problem we had was the band being way to short. I added about 1 inch to either side behind the hooks and eyes as you can see below. I tried a couple of different methods. Neither of which I like. Ahh well, it looks pretty craptastic but does the trick.

The cups fit her perfectly! Rejoyce! My lovely model is not a very good representation of what it looks like on my daughter. M has a wider ribcage. Everything else was good but I think if I make this again I'll widen the back band quite a bit. It's just too narrow for her build. Now we'll just see if she actually wears it. When we first tried it on it was a little tight (to her) and she got all whine-y and meltdown-y, like only teenagers can do.


Here's a funny/interesting little tidbit for you: A lady on one of the sewing groups I belong to mentioned her husband had been on a business trip to China, I believe, to a bra making factory (he worked for Bali). Well, I guess the lady laid her fabric out on a cutting table and took a sharpie and marked out all the pattern pieces, freehand. FREEHAND?! Isn't that amazing? It also explains why one bra might fit and another does not even though it's the same size, brand, style. That's another reason why women should NOT go by their perceived "size" and just go by fit. I believe bra sizing charts to be written by the devil, himself.

I'm going to cut this post off here. We'll have to talk some more about bra fitting sometime! I hope you all have a great weekend! I'll be packing since my kids are going to be spending next week with my Mom and Dad. It'll be quiet yet oh-so-nice....

Take it easy! 

Thursday, July 15, 2010

Lucky Number 13 and some Sewing...


Good Morning (or afternoon)! I just thought I'd do a quick post before all the kiddos wake up!

First of all, my baby girl celebrated her 13th birthday on Monday. I can hardly believe I'm the mother of a teenager now. I posted about it on facebook and got lots of comments in support of my impending doom. Above is the cake she picked out. She couldn't decide if she wanted me to make one or just buy one and then she say this lovely confection. It tasted okay but I seriously had trouble sleeping that night from all the sugar! Good grief! I wanted to post a cute picture of her blowing out the candles but she said to me, "NO posting that picture to the internet! I look weird!" Ah yes...it's starts.

We went to Wonderland Park in Amarillo, TX on Saturday to celebrate a little early. I have no pictures 'cause I forgot the camera. It was so nice though since our little man no longer needs a stroller. We didn't have to carry/push anything! It was amazing! My husband didn't have stroller duty so he actually got to ride some of the rides. He never really minded before since he has some inner ear problems and he doesn't do well on rides anyway. But I think he enjoyed himself even though he got a bit dizzy and nauseous. This is a nice amusement park that's not too big and still has some really great rides. The birthday girl and I rode all of the rollercoasters! Our fave! Mr. C even rode his very first one which is really saying something since he is terrified of heights. He loved it, though!

Secondly, I have been sewing! My sewing mojo is still seriously lagging but I've managed to bust out a few things. I made my daughter a swim suit!

                                         
It started with this top. She wanted a bikini oh-so-bad so I thought I'd give it a go. This top is from New Look 6357. The fabric and lining just weren't thick enough and everything shows through! Yikes! Plus, I'm not so sure how I feel about her in a bikini...

So, the second try I just did on my own without asking her opinion (which usually gets looks od disgust). I have several Jalie swimsuit patterns in my stash and this one is #2447. I picked out some fabric, also from the ol' stash, and just went to town. She didn't really know what I was doing and that can be a good thing. Anyhoo, this pattern goes together so fast and smooth I could hardly believe it. Oh, and it fits her ever-so-nicely! She's pear shaped so I really should have made the bottoms the next larger size but these will do. The top has a bit of room to 'grow' too, if you jnow what I mean. The fabric is from Chez Ami, of course, since I have a butt load of the stuff. It's really nice and the weight is perfect. I used a thicker lining fabric for the bra cups and I think it'll be okay. The suit has yet to see water so, we'll see.

Lastly, I'm test sewing again! This one is for Patterns by Figgy's and I must say these are some great britches! They look super sharp on too. I can't get my 'model' to model so my poor table has the job. These look so good on him! They have a flat front and elasticized back,

Contrast lining,

and front pockets.

I chose to make the pockets with the contrast fabric just for fun. The main fabric is a pale olive, stretch twill from a co-op and the lining is a quilting cotton called "Route 66" from Alexander Henry. This pattern will be released Aug. 1st and since this was a test there may be some slight changes in the final product. I thought it was pretty great as is but you never know... 

I'm getting geared up to spend the weekend at my Mom's. My sister and her family are back in the States for awhile. I think they go back to France at the end of July? Anyway, they're staying at Mom's for a couple of weeks and I haven't seen them since Christmas, I believe. I can't wait to see them!

Well, I have one little one that just wondered out of his room and is need of some snuggle time! Weekend is almost here, have a great one!

Monday, May 10, 2010

Weekend Sewing!

Happy (belated) Mother's Day to all the mommies out there. I actually got to sew this weekend! I finished this McCall's 5640 this morning and I'm wearing it today. It is quite comfortable if not a little Muu-muu-esque. Seriously, the ease in this puppy is redonkulous. According to my full bust measurement I should have made a 26 but it has, get this, 19" of ease. 19"!! I opted to go the route of using my upper bust measurement and the finished garment measurements to choose my size and with that I made the 18. It fits pretty good but the neckline is still a bit wide. Can you imagine if I had made the 26?! It would have been falling off my shoulders!! Good grief! There is one problem that my 5 year old son so lovingly pointed out while I was bent over in front of him, helping him into his shoes. He said, "Mom, I can see your bra...". Thanks, babe. So, it does gap open when I'm bending over. I may need to think about wearing a cami underneath.

Anyhoo, I made view "C" which is the top. I didn't have enough of this fabric to make the dress and I was really afraid a dress would have looked exactly like a Muu-muu anyway. I used a medium-weight quilting cotton that I bought last year, I think from Hobby Lobby? Maybe...? I dunno. It's a pretty aqua with vine-y swirls in cream and a dark purple/wine color.
The neckband is in a coordinating fabric:
I didn't even use interfacing like it says...'cause I'm out. I think it'll be okay though. The fabric is thick enough (I'm hoping). I'll be doing up a review for Pattern Review since I had the sizing issue and all. I thought it might be helpful to warn others about the insanity.

Up next on the chopping block is Butterick 5195. It's another one that I've read has an insane amount of ease so I'll be doing the same thing I did with this last top. I'm wanting to make view "A" but the drawing on the front is quite misleading. It shows a woman with sleeves that hit her above the elbow but the photo of the woman wearing view "B" (which is the same but lengthened into a dress) shows a more 3/4 length. What's wrong with these crazy illustrators? I'll be making a sort of morph between views "A" and "C". I'm still deciding on what fabric I'm going to use. I have some that I bought at the thrift store but I'm afraid it might look too much like lingerie so I may rethink it! I'll post more soon!

Happy Monday!

Tuesday, March 9, 2010

Something For ME

with really bad pictures because I didn't feel like setting up my "tripod" (which is in fact a chair with books, boxes and whatever else to get it the right height).
This is the Ottobre 2/2007 #2. I've made this before and I really like the fit.
Coverstitch Porn! Mmmmmm... 
On the last top I made I didn't do the sleeve as instructed and just did a straight hem. This time I did but I'm not really sure if I did it right. The instructions kinda confused me (not so hard these days!). I think it looks okay even though it's not lined up perfectly. Ah well..... at least it's another piece of clothing for my steadily dwindling wardrobe! Oh, I used Chez Ami fabric...again.

Wednesday, February 10, 2010

Bra sewing again!

I've finally carved out a little time to make myself some new bras! All of mine are getting worn out and after having several conversations about bra making with Kristin, my juices got flowing to make some. Also, Pattern Review is holding a Lingerie Contest. It ends Feb. 14th and I thought I should get busy! LOL! The bra above is a mock up of one of my custom drafted Danglez patterns. If you look closely you can get a glimpse of the fabric I'm using for the contest piece. It's a really fun animal print with swirls and little silver paillette thingies. This bra has a diagonal seam cup and I just love how it fits! The details are more visible here on my dress form:

I wore it all day yesterday and didn't have to tug or adjust and I just love that! The contest bra is proving to be a little bit more difficult than the trial bra. It just sort of sewed itself. The print fabric is really stretchy and lightweight, almost to the point of being a mesh. Needless to say, it has to be fully lined and that makes things fussy. I'll cut a panty or two to go with it. Hopefully, I can get it all done before the weekend!

Thursday, December 3, 2009

My new favorite shampoo!

A little side project that has been ongoing for me is making my own bath and body products. In an effort to reduce the toxic chemicals in our household I've turned to using more natural products. One of my favorite things to make is shampoo and it's super easy to do. You might have to make a trip to your health food store to get some of these ingredients. I don't live in a large area and was able to find all of them locally. Amazon.com is a great source for the liquid castile soap!

I've been playing around with different formulas and I want to share a couple that we really like. The first is one that I use the most and the second is one I make up for the kids. Each recipe makes about 4.5 ounces.
One thing I would like to mention before we get started is, while I am an 'independent student' (since I'm learning on my own from books) of aromatherapy and the different uses of essentials oils, I am by no means an expert! Please use caution when handling these oils as they are very potent! If you're unsure if you can use any of them consult a handbook (or even your doctor). I have a couple of books by Valerie Ann Worwood which I really like!
Okie Dokie! Enough of that business, let's get cookin'!!

Lemon Rosemary Shampoo

1/4 cup Distilled Water
1/4 cup Liquid Castile Soap (I use Dr. Bronner's unscented)
2 TBSP Dried Rosemary
2 tsp Sweet Almond Oil
1/4 tsp Lemon Essential Oil (I prefer using essential oils but you can use fragrance oil too)
5-10 drops Tea Tree Essential Oil
Some sort of container (I use a glass bottle that is for oil and vinegar. Got it for $1 at the Dollar Tree and the little spout is the perfect dispenser. I have also reused old shampoo bottles. Just be sure to rinse them well first.)
Boil the water and then sprinkle the Rosemary over top. Let steep for about 20-30 minutes. Meanwhile, pour the Castile Soap in your bottle. Add the Sweet Almond Oil and your Essential Oils. I find using a funnel is most helpful for all this. Once your Rosemary tea is done you'll strain the leaves and discard. Pour the tea into the bottle and swish it all around to mix. In the shower, be sure to shake before each use since the ingredients will separate. Lather, Rinse, Repeat!

This fragrance is fresh and uplifting and makes my hair shiny and bouncy. It isn't thick like the stuff you get at the store so you will have to pour a little over your head. Otherwise, you just use it like you would normally. The castile soap make lots of fluffy lather and with the essential oils you get the benefit of aromatherapy! This type of shampoo is also gentle so you will probably need to rinse and repeat. The oil in the mix makes conditioner unnecessary! Yay!

The next one is very kid friendly (smell-wise) and the easiest to make. My daughter helped me make up the last batch which was fun. Anyhoo, once all the kids' store-bought shampoo ran out I wanted to make them something they would like. The Lemon Rosemary Shampoo is wonderful but a bit herbaly and more astringent smelling. Let's just say, my 5 year old son wasn't a big fan. This one smells really yummy and makes my hair look and feel really good. My daughter has super duper thick hair and it works great for her, too. It also has the stamp of approval from Mr. Picky.

Creamsicle Shampoo

1/4 cup Liquid Castile Soap
1/4 cup Distilled Water
2 tsp Jojoba Oil
10-15 drops Vanilla Essential Oil
10-15 drops Orange Essential Oil
5-10 drops Tea Tree Oil (optional)
Bottle

Pour all ingredients into your bottle and swish around to mix. Shake before each use. Lather, Rinse, Repeat! See, I told you it was easy!

This is the Creamsicle Shampoo. Oops, looks like I need to make some more!

I'd like to maybe make this a regular feature to my blog. What do you all think? If any of you out there make your own b&b stuff too let me know. I love to try out new recipes!

LinkWithin

Blog Widget by LinkWithin